
MVVM pattern in SwiftUI
5 June 2020
- Introduction
- Environment
- The MVVM pattern
- Building an application with MVVM
- The result
- Conclusions
- References
Introduction
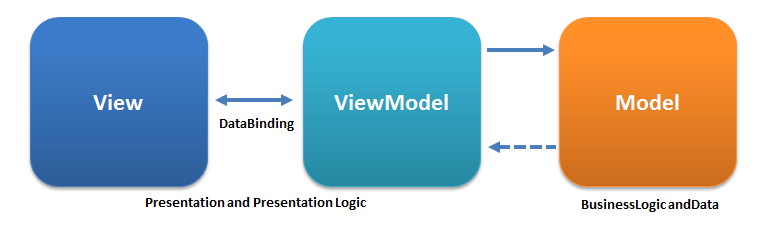
Model-View-ViewModel (MVVM) is the quite popular architectural pattern for designing iOS applications. It's a good reason to study it. The MVVM architecture pattern consists of separating our application into three layers: business logic, graphical interface, and presentation logic. The ViewModel represents the state of the view and manages the view components and their states through binding. Previously, to use this pattern we had to use a closure, the Key-Value Observing (KVO) mechanism or third-party libraries, as well as RxSwift. The introduction of SwiftUI has changed things. Now we do have the instruments such as property wrappers @State and @Binding to create binding that allow us to use this pattern without using third-party libraries. In this tutorial we are going to see how you can create iOS applications with SwiftUI and Combine using this pattern.
Environment
This tutorial is written using the following environment:
- Hardware: MacBook Pro 15' (2.5 GHz Intel Core i7, 16GB DDR3, mid-2015)
- Operating system: macOS Catalina 10.15
- Software versions:
- Xcode: 11
- iOS SDK: 13.4
It is important to know that to try SwiftUI you need to install Mac OS Catalina 10.15 and Xcode 11.
The MVVM pattern
The goal of MVVM is to separate business and presentation logic from the user interface. This improves testability and maintainability. To achieve its goal, MVVM minimizes decision making in views and moves the state and behavior of the view to the view model. In this way, the view becomes passive: it has its state managed by the ViewModel. Such a design allows us to test the presentation logic isolated from the graphical interface.
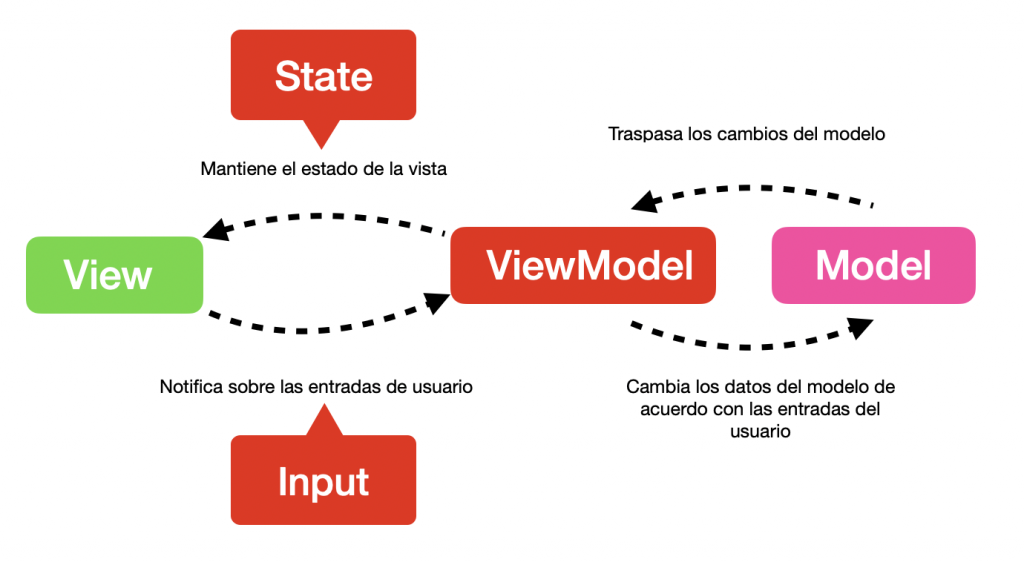
In an MVVM architecture, View components have a ViewModel, which provides a specific State to the View. You can implement different versions of MVVM. While a "Redux" architecture typically completely exposes the single state of the entire app, we can also allow each ViewModel to have its own state. In our example, the view only knows the properties provided to it by ViewModel, since then ViewModel could have completely different information than the initial Model. Instead of specifying a global state of the application, we specify a specific state of the view.
# Our version of MVVM
Our version of MVVM is based on a specific state of each module and actions triggered by specified inputs. We also want to be able to change the ViewModel presentation logic (i.e. the actions of a ViewModel) without any changes to the View components, so we define a ViewModel protocol and a ViewModel object container AnyViewModel.
The ViewModel protocol has two associated types. The state type refers to the state type of a specific view, while Input can be used to specify an input that can be activated using the trigger() method. This trigger method can be implemented to send events to our ViewModel.
protocol ViewModel: ObservableObject where ObjectWillChangePublisher.Output == Void {
    associatedtype State
    associatedtype Input

    var state: State { get }
    func trigger(_ input: Input)
}
The AnyViewModel type is a container that conforms to the ViewModel protocol and uses the State and Input generic types.
final class AnyViewModel<State, Input>: ObservableObject {

    private let wrappedObjectWillChange: () -> AnyPublisher<Void, Never>
    private let wrappedState: () -> State
    private let wrappedTrigger: (Input) -> Void

    var objectWillChange: some Publisher {
        wrappedObjectWillChange()
    }

    var state: State {
        wrappedState()
    }

    func trigger(_ input: Input) {
        wrappedTrigger(input)
    }

    init<V: ViewModel>(_ viewModel: V) where V.State == State, V.Input == Input {
        self.wrappedObjectWillChange = { viewModel.objectWillChange.eraseToAnyPublisher() }
        self.wrappedState = { viewModel.state }
        self.wrappedTrigger = viewModel.trigger
    }

}
Building an application with MVVM
Let's build the app with Marvel characters. The app will be very simple. We use it only to demonstrate the MVVM pattern. The application will have two screens:
- The view with the list of Marvel characters that can be filtered and that supports pagination.
- The details view of a character that shows the character avatar.
For our main view with the list of characters we define a state type and an entry type. The CharacterListView state contains the list of characters, the state of the model data (inactive, loading, loaded, error), the page number of the list (our list supports pagination) and the publisher that issues the search terms (our list can be filtered).
struct CharactersListState {
    var characters: [Character] = []
    var dataState: ModelDataState = .idle
    var page: Int = 0
    var searchTerm: CurrentValueSubject<String, Never> = CurrentValueSubject<String, Never>("")

    mutating func changeViewModelState(newViewModelState: ModelDataState) {
        dataState = newViewModelState
    }

    mutating func changePage(newPageNumber: Int){
        page = newPageNumber
    }
}
We also define the state of the model data which can be inactive (at the beginning), loading (if the request is running), loaded (if we already have the results of the request) and error (if the request returns the error).
enum ModelDataState: Equatable {
    static func == (lhs: ModelDataState, rhs: ModelDataState) -> Bool {
        switch (lhs, rhs) {
        case (.idle, .idle):
            return true
        case (.loading, .loading):
            return true
        default:
            return false
        }
    }
    case idle
    case loading
    case loaded
    case error(Error)
}
CharacterListView
We inject the ViewModel into our view through the EnvironmentObject property wrapper. As you can see, our view only knows the data provided by the ViewModel. We reflect the status of the data in the graphical interface by showing a spinner or a text in the case of an error.
struct CharacterListView: View {
    @EnvironmentObject
    var viewModel: AnyViewModel<CharactersListState, CharacterListInput>

    var body: some View {
        VStack() {
            SearchBar(input: viewModel.searchTerm, placeholder: "Search characters")
            content
        }
    }

    private var content: some View {
        switch viewModel.state.dataState {
        case .idle:
            return Color.clear.eraseToAnyView()
        case .loading:
            return LoadingView().frame(maxHeight: .infinity).eraseToAnyView()
        case .error(let error):
            return Text(error.localizedDescription).eraseToAnyView()
        case .loaded:
            return self.characterList(characters: self.viewModel.state.characters).eraseToAnyView()
        }
    }
If the data has already been loaded into our model we show a list with the characters.
private func characterList(characters: [Character]) -> some View {
        List {
            ForEach(characters, id: \.id) { character in
                NavigationLink(
                    destination: DetailCharacterView(result: character)
                ) {
                        VStack(spacing: 10) {
                            Text("\(character.name ?? "")").frame(maxWidth: .infinity, alignment: Alignment.leading)
                            if self.viewModel.state.dataState == .loaded && self.viewModel.state.characters.isLastItem(character) {
                                Divider()
                                LoadingView()
                            }
                        }.onAppear {
                            self.listItemAppears(character)
                        }
                }
            }
        }
    }
To create a list with pagination we have to make some changes to the normal list. We implement the isThresholdItem method inside the List extension to know how close the current list item is.
public func isThresholdItem<Item: Identifiable>(offset: Int,
                                                    item: Item) -> Bool {
        guard !isEmpty else {
            return false
        }

        guard let itemIndex = firstIndex(where: { AnyHashable($0.id) == AnyHashable(item.id) }) else {
            return false
        }

        let distance = self.distance(from: itemIndex, to: endIndex)
        let offset = offset < count ? offset : count - 1
        return offset == (distance - 1)
    }
If we are near the end of the list we add another "page" of data to our list. The trigger() method is a way to pass events to our ViewModel.
extension CharacterListView {

    private func listItemAppears<Item: Identifiable>(_ item: Item) {
        if self.viewModel.state.characters.isThresholdItem(offset: 5, item: item)  {
            self.viewModel.trigger(.nextPage)
            self.viewModel.trigger(.reloadPage)
        }
    }
}
In the CharactersListViewModel constructor we launch the request to obtain the Marvel characters. Additionally, we put a bounce limit of 0.5 seconds on the publisher of the search terms, because the user can enter the text into the search field quite quickly. And in this way we restrict the number of requests.
Note that CharactersListViewModel implements the ObservableObject protocol. This allows us to bind a view to the view model. SwiftUI will automatically update the view whenever the view model updates its state.
class CharactersListViewModel: ViewModel {

    private var cancellableSet: Set<AnyCancellable> = []

    @Published
    var state: CharactersListState

    init(state: CharactersListState) {
        self.state = state
        loadCharacters(searchTermInput: state.searchTerm)
        //set the waiting time limit at 0.5 sec when the value changes
        self.state.searchTerm.debounce(for: 0.5, scheduler: RunLoop.main)
        .removeDuplicates()
        .sink(receiveCompletion: {_ in}) { (searchTerm) in
            self.trigger(.newSearch)
        }.store(in: &cancellableSet)
    }
}
We launched the request to obtain the characters through our MarvelAPI service. Depending on the response we set the state of our ViewModel by calling changeViewModelState: the mutant method of our ViewModelState state.
func loadCharacters(searchTermInput: CurrentValueSubject<String, Never>) {
        do {
            MarvelAPI.characters(page: self.state.page, searchTerm: searchTermInput.value).sink(receiveCompletion: { completion in
                switch completion {
                case .failure(let error):
                    self.state.changeViewModelState(newViewModelState: .error(error))
                    switch error {
                    case .serverError(code: let code, message: let reason):
                        print("Server error: \(code), reason: \(reason)")
                    case .decodingError:
                        print("Decoding error \(error)")
                    case .internalError:
                        print("Internal error \(error)")
                    }
                default: break
                }
            }) { (charactersResponse) in
                            if let results = charactersResponse.data?.results {
                                self.state.changeViewModelState(newViewModelState: .loaded)
                                print("Characters: \(results)")
                                if self.state.page > 0 && !self.state.characters.elementsEqual(results, by: { (character, result) -> Bool in
                                    character.id==result.id
                                }) {
                                    var addedCharacters = Array(self.state.characters)
                                    addedCharacters.append(contentsOf: results)
                                    self.state = CharactersListState(characters: addedCharacters, dataState: .loaded, page: self.state.page, searchTerm: searchTermInput)
                                } else {
                                    self.state = CharactersListState(characters: results, dataState: .loaded, page: self.state.page, searchTerm: searchTermInput)
                                }
                            }
                        }
            .store(in: &cancellableSet)
        }
    }
The network client talks to the Marvel API to get the characters. I'm leaving out some implementation details to keep focus on the main topic:
enum MarvelAPI {
    static func characters(page: Int, characterId: String? = nil, searchTerm: String? = nil) throws -> AnyPublisher<CharacterResponse, APIError> {
        guard let url = URL.characters(limit: 20, offset: (page * 20), nameStartsWith: searchTerm) else {
            throw MarvelApiError.urlIncorrect
        }
        if page >= 0 {
            return send(url, method: .GET)
        }
        else {
            throw MarvelApiError.pageOutOfRange
        }
    }

    static func comics(comicId: String? = nil) -> AnyPublisher<ComicResponse, APIError> {
        return send(URL.comics(comicId), method: .GET)
    }
}
# CharacterDetailView
For our CharacterDetailView, we are not going to use ViewModel, because it is too simple.
struct DetailCharacterView: View {
    var character: Character?
    @Environment(\.imageCache) var cache: ImageCache

    init(result: Character? = nil) {
        UINavigationBar.appearance().largeTitleTextAttributes = [.font : UIFont.boldSystemFont(ofSize: 30)]
        self.character = result
    }

    var body: some View {
        GeometryReader{ viewGeometry in
            VStack {
                    ScrollView(.horizontal, showsIndicators: false){
                        GeometryReader{ imageGeometry in
                            AsyncImage(
                                url: self.character?.thumbnailUrl(),
                                cache: self.cache,
                                placeholder: LoadingView()
                            )
                            .frame(width: 300, height: 300)
                            .clipShape(Circle())
                            .shadow(radius: 10)
                            .padding(15)
                        }
                    }.frame(height:340)

                    Text(self.character?.description ?? "").padding(5)

                    if (self.character?.comics?.items?.count ?? 0 > 0) {
                        List {
                            Section(header: Text("Comics")) {
                                ForEach(self.character?.comics?.items ?? [], id: \.id)  {
                                    comic in
                                    Text(comic.name ?? "")
                                }
                            }
                        }
                    }

            }.navigationBarTitle(Text(self.character?.name ?? ""))
        }

    }
}
The result
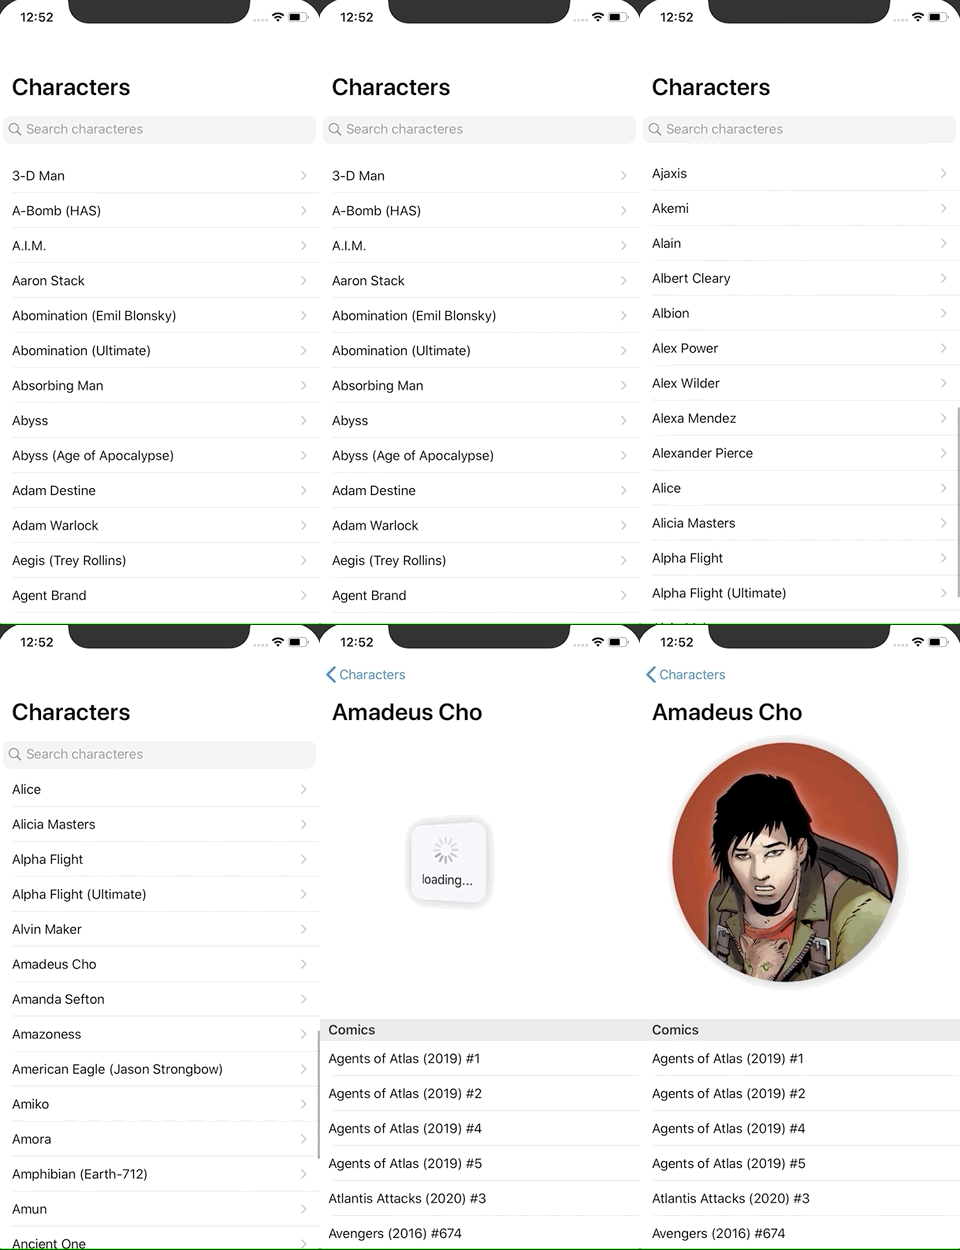
We change the graphical interface depending on the state of our view model (ViewModel):
struct CharactersListView: View {
    ...

    private var content: some View {
        switch viewModel.state {
        case .idle:
            return Color.clear.eraseToAnyView()
        case .loading:
            return Spinner(isAnimating: true, style: .large).eraseToAnyView()
        case .error(let error):
            return Text(error.localizedDescription).eraseToAnyView()
        case .loaded(let characters):
            return list(of: characters).eraseToAnyView()
        }
    }

    private func list(of characters: [CharactersListViewModel.ListItem]) -> some View {
        ...
    }
}
Here list(of:)*method is implemented:
private func list(of characters: [CharactersListViewModel.ListItem]) -> some View {
    return List(characters) { character in
        NavigationLink(
            destination: CharacterDetailView(viewModel: CharacterDetailViewModel(characterID: character.id)),
            label: { CharacterListItemView(character: character) }
        )
    }
}
CharacterDetailView represents details of a Marvel character. If a user taps a row in the list, it will be pushed to the navigation stack. CharacterDetailView is initialized with a view model which in turn accepts an identifier from the character.
Conclusions
Considering an MVVM architecture with separate state in each ViewModel, we identify the following potential advantages and disadvantages.
# Disadvantages:
- There is no single source of truth: Different ViewModels are separate objects and there is no single source of truth by default.
- Code overhead: Increased modularization of an application increases code overhead, since instead of using a single storage for multiple views, we define a ViewModel class for each view individually.
- As the complexity of the module grows, there is a risk of unstoppable growth of a ViewModel. You have to be very careful with the ViewModel and move the additional logic (for example navigation) to other files.
# Advantages:
- Reuse: A view does not depend on the state of the entire application or a ViewModel. We can reuse this view in multiple places or even in different applications without changing the code of a view.
- No dependencies between views: we only have specific states of each view, no unforeseen dependencies between views are possible.
- Maintenance: The state of a single view is visible immediately, developers who are not familiar with a certain project can easily identify errors without understanding in depth how all the components work.
We have seen how easy it is to implement the MVVM pattern with SwiftUI. What is even more interesting is that SwiftUI facilitates any pattern thanks to its new features such as binding or propery wrappers, views as structures etc. Combining SwiftUI and MVVM can help prevent the creation of massive files (like in UIKit with huge UIViewController) that are difficult to maintain. In short, as long as you don't implement any heavy logic in your SwiftUI View, any pattern is appropriate. SwiftUI becomes a perfect candidate for many other patterns. As long as the code remains easy to test and adheres to other best practices, you can experiment and try different patterns and architectures.
You can download the full project in the repo here.