
Managing windows in iPadOS
2020-07-14
- Introduction
- How to declare Scene Delegate
- New way to handle states in Swift UI (iOS14)
- App adaptation to new scene API
- Methods to create windows
- Updating window content
- Conclusions
- References
Introduction
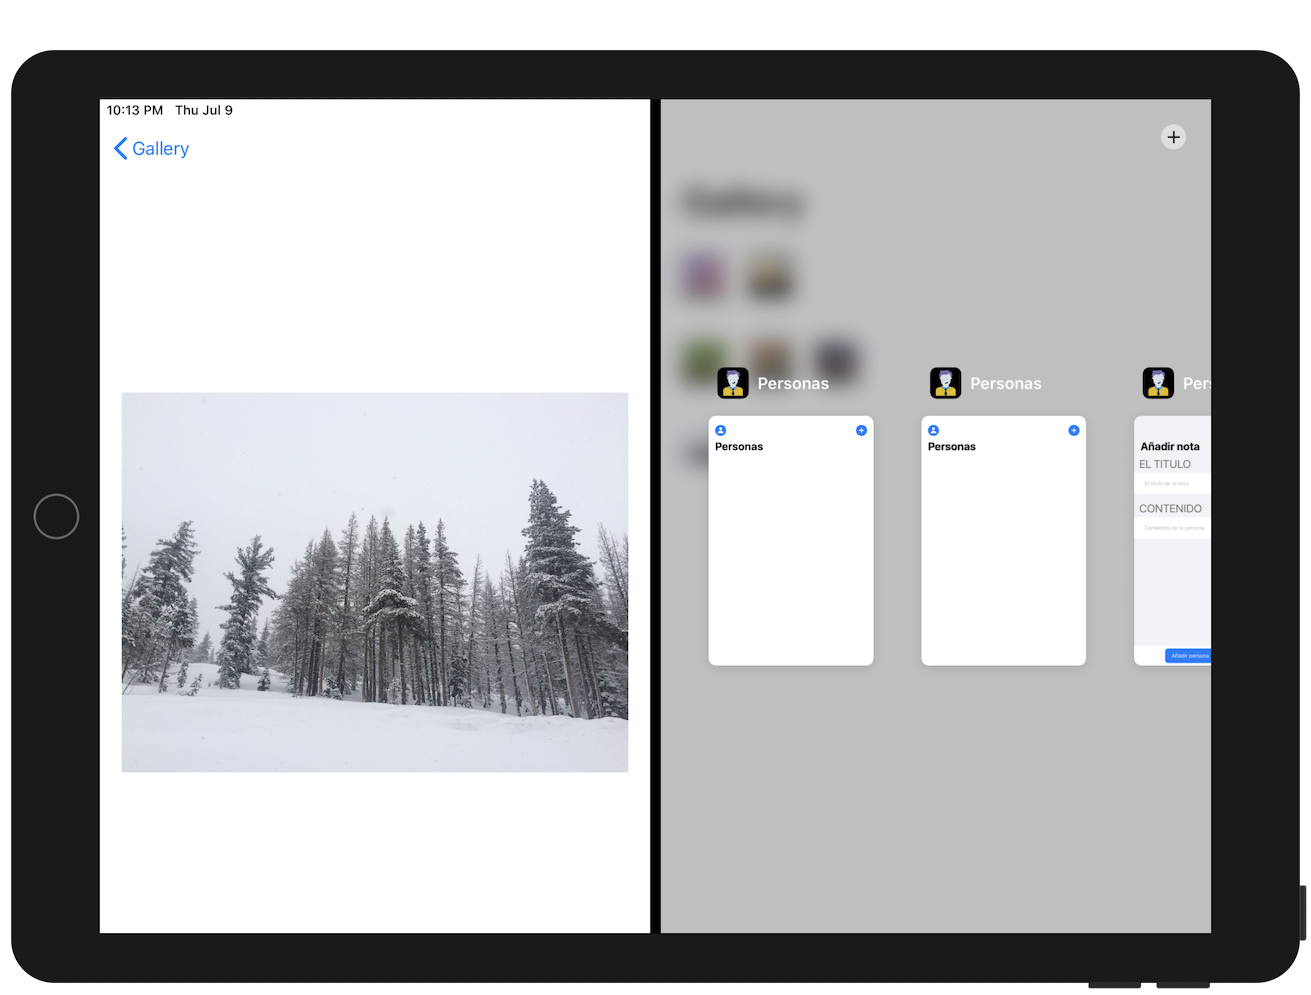
With the introduction of iOS 13 on iPad OS we finally have the possibility to create and use windows in our iOS app. In this tutorial we learn it. Historically iOS apps used only one window. Each window can contain completely different or similar information. To implement it we don't have to make much effort. The process is quite simple and clear. At the moment only iPad users can enjoy this functionality, but surely in the future we can see it on iPhones as well.
How to declare Scene Delegate
Apple has significantly changed the app lifecycle in iOS 13. Previously each app had only one window and its lifecycle was managed by UIApplicationDelegate. But in iOS13 each application can have different windows (scenes) and the life cycle of each one must be managed. UISession now controls the window lifecycle. There are also new protocols to handle the window lifecycle: UISceneSession, UISceneDelegate and UISceneConfiguration. These new features change the way you interact with UIApplicationDelegate. Many of the UIApplicationDelegate methods have now been moved to the UIWindowSceneDelegate scene delegate.
import UIKit
import SwiftUI

class SceneDelegate: UIResponder, UIWindowSceneDelegate {

    var window: UIWindow?

    func scene(_ scene: UIScene, willConnectTo session: UISceneSession, options connectionOptions: UIScene.ConnectionOptions) {
        // Use this method to optionally configure and attach the UIWindow `window` to the provided UIWindowScene `scene`.
        // If using a storyboard, the `window` property will automatically be initialized and attached to the scene.
        // This delegate does not imply the connecting scene or session are new (see `application:configurationForConnectingSceneSession` instead).

        // Create the SwiftUI view that provides the window contents.
        let contentView = ContentView()

        // Use a UIHostingController as window root view controller.
        if let windowScene = scene as? UIWindowScene {
            let window = UIWindow(windowScene: windowScene)
            window.rootViewController = UIHostingController(rootView: contentView)
            self.window = window
            window.makeKeyAndVisible()
        }
    }

    func sceneDidDisconnect(_ scene: UIScene) {
        // Called as the scene is being released by the system.
        // This occurs shortly after the scene enters the background, or when its session is discarded.
        // Release any resources associated with this scene that can be re-created the next time the scene connects.
        // The scene may re-connect later, as its session was not neccessarily discarded (see `application:didDiscardSceneSessions` instead).
    }

    func sceneDidBecomeActive(_ scene: UIScene) {
        // Called when the scene has moved from an inactive state to an active state.
        // Use this method to restart any tasks that were paused (or not yet started) when the scene was inactive.
    }

    func sceneWillResignActive(_ scene: UIScene) {
        // Called when the scene will move from an active state to an inactive state.
        // This may occur due to temporary interruptions (ex. an incoming phone call).
    }

    func sceneWillEnterForeground(_ scene: UIScene) {
        // Called as the scene transitions from the background to the foreground.
        // Use this method to undo the changes made on entering the background.
    }

    func sceneDidEnterBackground(_ scene: UIScene) {
        // Called as the scene transitions from the foreground to the background.
        // Use this method to save data, release shared resources, and store enough scene-specific state information
        // to restore the scene back to its current state.
    }

}
As you can see, they are practically the same as the methods of the UIApplicationDelegate protocol. In iOS 13 in UIApplicationDelegate we have two new methods to manage sessions.
@UIApplicationMain
class AppDelegate: UIResponder, UIApplicationDelegate {
    func application(_ application: UIApplication, didFinishLaunchingWithOptions launchOptions: [UIApplication.LaunchOptionsKey: Any]?) -> Bool {
        // Override point for customization after application launch.
        return true
    }

    // MARK: UISceneSession Lifecycle

    func application(_ application: UIApplication, configurationForConnecting connectingSceneSession: UISceneSession, options: UIScene.ConnectionOptions) -> UISceneConfiguration {
        // Called when a new scene session is being created.
        // Use this method to select a configuration to create the new scene with.
        return UISceneConfiguration(name: "Default Configuration", sessionRole: connectingSceneSession.role)
    }

    func application(_ application: UIApplication, didDiscardSceneSessions sceneSessions: Set<UISceneSession>) {
        // Called when the user discards a scene session.
        // If any sessions were discarded while the application was not running, this will be called shortly after application:didFinishLaunchingWithOptions.
        // Use this method to release any resources that were specific to the discarded scenes, as they will not return.
    }

}
They are used to configure sessions (session role: window or document, view hierarchy) and to remove all resources from discarded sessions.
New way to handle states in Swift UI (iOS14)
In the latest betas of Xcode 12, there is a new option when creating a SwiftUI application: «SwiftUI App«. It is one of two options for the application lifecycle. Now we can control the session loop with SwiftUI's declarative code. It is a much more compact and clear way.
@main
struct HelloWorldApp: App {
    @Environment(\.scenePhase) private var scenePhase
    @SceneBuilder var body: some Scene {
        WindowGroup {
            ContentView()
        }
        .onChange(of: scenePhase) { (newScenePhase) in
            switch newScenePhase {
            case .active:
                print("scene is now active!")
            case .inactive:
                print("scene is now inactive!")
            case .background:
                print("scene is now in the background!")
            @unknown default:
                print("Apple must have added something new!")
            }
        }
        Settings {
            SettingsView()
        }
    }
}
Previously, this was handled in AppDelegate and SceneDelegate (two different files), which made it difficult to manage the state of the application.
We have to put the property wrapper @SceneBuilder to the body property if we want to include more than one scene in the app.
Also, now the AppDelegate and SceneDelegate files are not in the project. Instead, a file called <App Name> App replaces them.
# The news of the new structure
Inside this file there are some new features:
- @main tells Xcode that the next structure, HelloWorldApp, will be the entry point for the application. Only one structure can be marked with this attribute.
- According to the documentation, App is a protocol that "represents the structure and behavior of an application." HelloWorldApp fits this. It's like the base application view. Literally, here you write what the application will look like.
- Scene: the body of a SwiftUI view must be of type View. Similarly, the body of a SwiftUI application must be of type UIScene.
Each scene contains the root view of a view hierarchy and has a system-managed lifecycle. The scene acts as a container for your views. The system decides when and how to present the view hierarchy in the user interface in a way that is appropriate for the platform and depends on the current state of the application.
And because the macOS and iPadOS platforms support multiple windows, fitting all app views into a scene makes it easier to reuse while allowing for “scene phases” that include active, inactive, and background states. WindowGroup is a scene that wraps views. The view we want to present, (ContentView) is a View, not a scene. WindowGroup allows us to wrap them into a single scene that SwiftUI can recognize and display. First we make a property, scenePhase, that gets the current state of system activity. The backslash () indicates that we are using a keypath, which means that we are referring to the property itself and not its value. And every time the property value changes, the onChange modifier is called, where we can get the lifecycle state.
Adaptation of app to new scenes API
To add multiple window support to your application you must update the Info.plist file. The following steps to update the Info.plist file:
- Open Info.plist
- Click the «+» button and add the Application Scene Manifest node.
- Open the Application Scene Manifest element by clicking the (▼) button.
- Set the value of “Enable Multiple Windows” to “YES”.
- Open the «Scene Configuration» element, clicking the (+) button to add the new scene configuration
- Choose «Application Session Role».
- Opens the first element «Item 0» which contains the values like «Class Name«, «Delegate Class Name«, «Configuration Name» and «Storyboard Name«. You need to fill "Delegate Class Name" with the name of your scene's delegate class (for example, $(PRODUCT_MODULE_NAME).SceneDelegate), "Configuration Name" with a unique name that the application will use to identify the scene internally, "Storyboard Name" with the name of the storyboard that contains the initial UI of the scene (delete it if you use SwiftUI), and "Class Name" with the name of the scene class is usually UIWindowScene (you can usually delete it too).
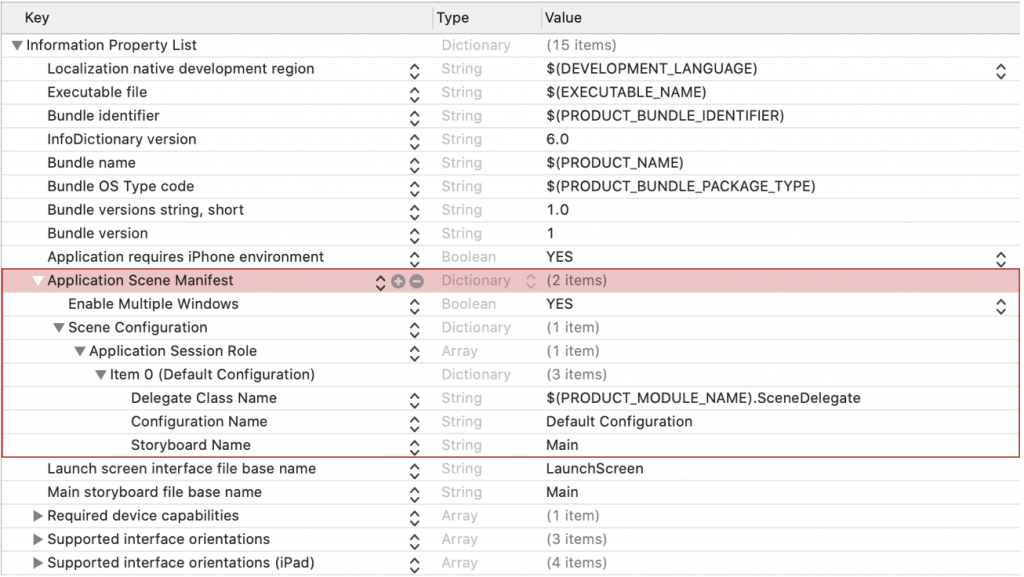
After you have set these values, you have to add a scene delegate.
# Add a scene delegate
The class name of this scene delegate must match the class name you put in the Info.plist file in the previous step. Create a new Swift file called SceneDelegate.swift and add the following code to the new file:
import UIKit

@available(iOS 13.0, *)
class SceneDelegate: UIResponder, UIWindowSceneDelegate {

  var window: UIWindow?

  func scene(
    _ scene: UIScene,
    willConnectTo session: UISceneSession,
    options connectionOptions: UIScene.ConnectionOptions
  ) {
    if let windowScene = scene as? UIWindowScene {

      let window = UIWindow(windowScene: windowScene)
      window.rootViewController = UIHostingController(
        rootView: ContentView()
      )
      self.window = window
      window.makeKeyAndVisible()
    }
  }
}
If you need iOS 12 support, add the *@available(iOS 13.0, ) switch. Will only build for iOS 13. You have to add the window property.
You may need to reproduce some of your existing application logic in your new scene delegate. In iOS 13, the scene delegate performs many functions that UIApplicationDelegate performed. If you only want compatibility with iOS 13 and later, move this logic. If supported on iOS 13 and earlier operating systems, leave the UIApplicationDelegate code as is and also add it to the scene delegate. As you can see, the scene delegate partially duplicates the functionality of the application delegate (UIApplicationDelegate).
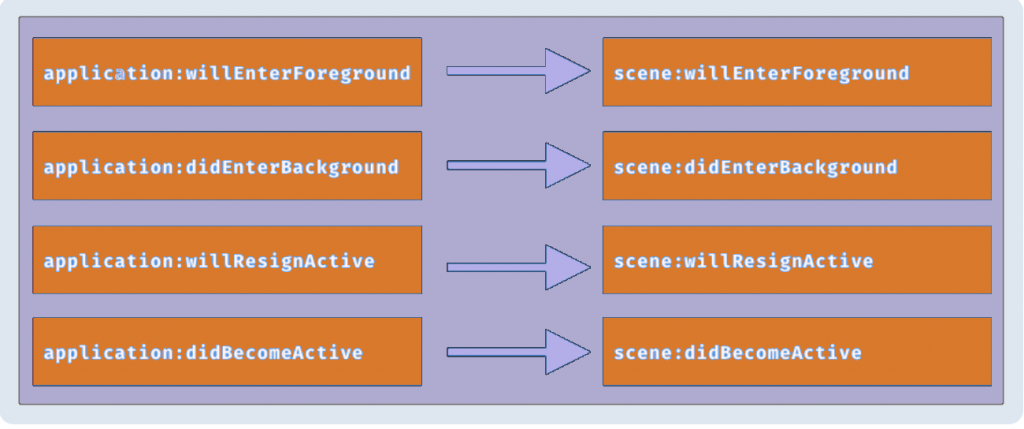
With that we can create new windows using three different methods.
The methods to create different windows
A user can create the new windows using several different methods:
If the app declares multi-window support, the user can enter multitasking view by swiping up to show the dock and tapping on their app icon while the app is already in the foreground, until the menu appears with “Show All Windows.” Pressing this button opens the following view of application windows, including a plus (+) button to create a new window:
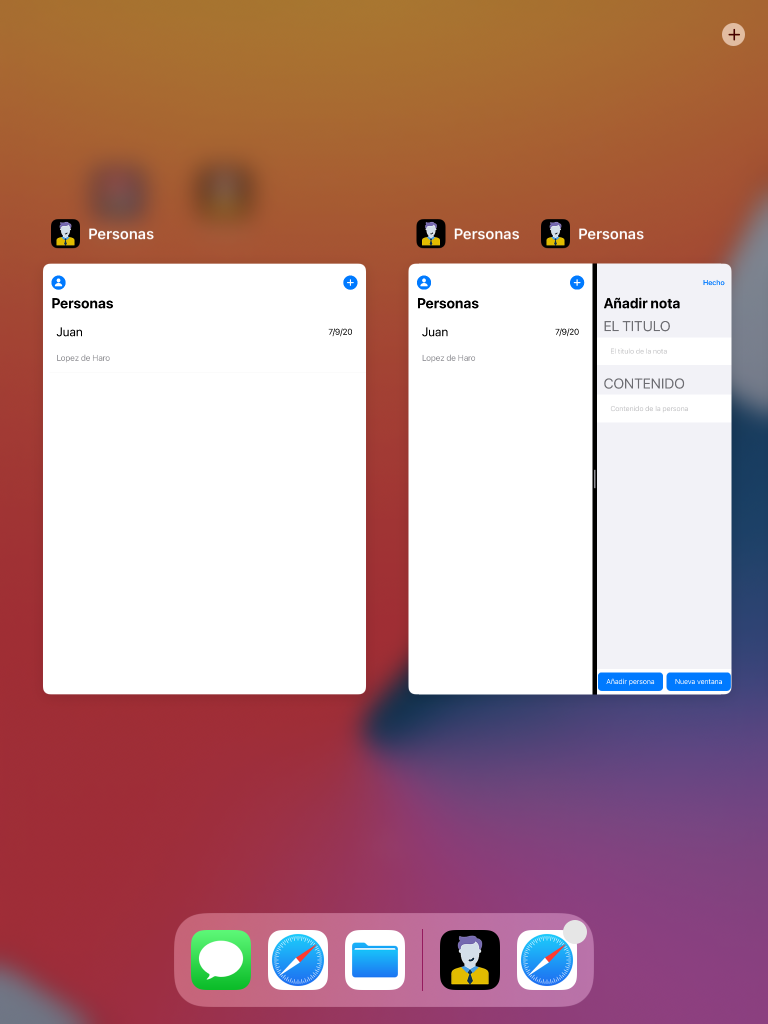
With the app in the foreground, swipe up to show the dock again. This time, drag the app icon out of the dock until it becomes a floating window. Place the window on the right or left side of the screen. You now have a second window running in sliding mode:
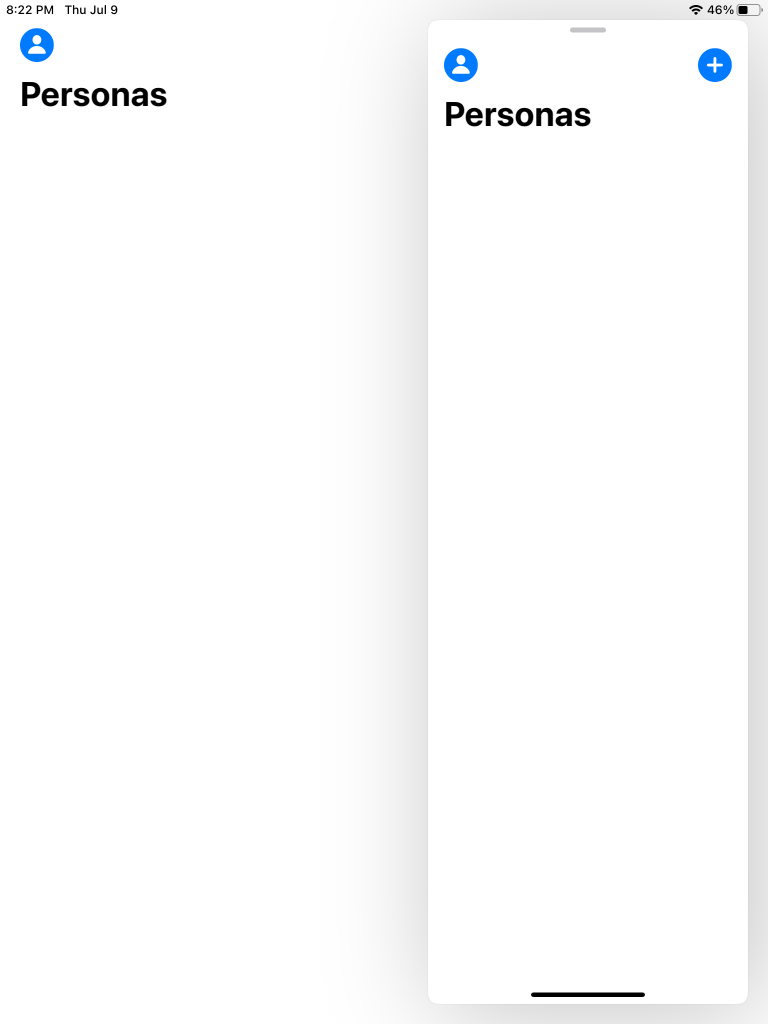
With the sliding window still running, tap and hold the drag handle at the top of the window. Pull down and to the right until the window changes shape. You now have two windows running side by side. You can also move the handle in the middle to resize these windows:
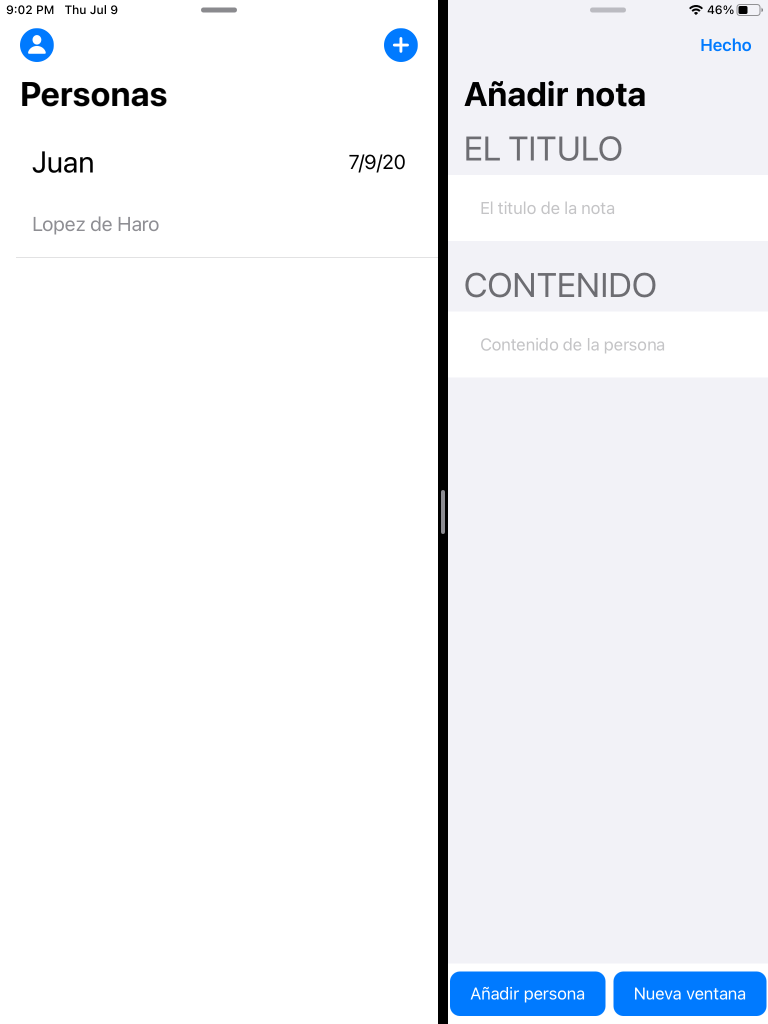
Adding support for additional scenes is pretty simple, but you need to consider where it makes sense to add this support and how to keep your windows in sync.
Update window content
If you have tried to implement scene handling, you may notice that there is a problem with the interface state when data changes. You need a way to tell the UI to update its current state and request the data again. This is where UISceneSession comes into play. A scene session can be in one of the following states:
- Foreground Active: The scene is running in the foreground and is currently receiving events.
- Foreground Idle: The scene is running in the foreground but is not currently receiving events.
- Background: The scene runs in the background and is not on the screen.
- Disconnected: The scene is not currently connected to the app.
Scenes can be taken offline at any time, because iOS can take them offline to free up resources. You must manage scenes in both the foreground and background to keep your scenes up to date.
One way to do this is to use a familiar tool: NotificationCenter. You can update any foreground session by listening to the appropriate notification and requesting updates.
Scenes in the background can be refreshed. To find and update these scenes, you must first attach identifying information to them. This way, you can find them later. For this purpose, the userInfo property of the scene session can be used.
Update *application(_:configurationForConnecting:options:)*in AppDelegate.swift to attach a userInfo dictionary to the scene session. Right after creating the scene setup, add the following code:
let userInfo = [
  "type": activity.rawValue
]
connectingSceneSession.userInfo = userInfo
You can then update the status of the scenes as follows:
func updateListViews() {
  let scenes = UIApplication.shared.connectedScenes
  let filteredScenes = scenes.filter { scene in
    guard
      let userInfo = scene.session.userInfo,
      let sceneType = userInfo["type"] as? String,
      sceneType == "specialViewId"
      else {
        return false
    }

    return true
  }
  filteredScenes.forEach { scene in
    UIApplication.shared.requestSceneSessionRefresh(scene.session)
  }
}
Conclusions
Adding support for scenes changes how the iOS app responds to lifecycle events. In a sceneless application, transitions to the foreground or background are handled by the application delegate object. When you add scene support to your app, UIKit transfers that responsibility to its scene delegate objects. Scene lifecycles are independent of each other and independent of the application, so scene delegate objects must handle transitions. Scenes pave the way for next-level multitasking on iPadOS. It is a very important novelty not only for iPad users, but also for those who have iPhone. In the future this functionality will undoubtedly reach all Apple mobile devices.