
Create the widgets with WidgetKit
2020-11-10
Introduction
In this tutorial we are going to learn how to create widgets with WidgetKit in iOS 14. The new version of iOS has brought us a redesigned Home screen (Springboard), with the inclusion of widgets as a great novelty. Widgets are not just a pretty view. They also help provide useful information to the user. In some ways, they are a more discreet form of notification that provides the latest information from apps. Plus, there's a new Smart Stack feature in iOS 14 that groups together a swipeable set of widgets. Smart batteries tend to provide the relevant widget on top by using on-device intelligence that takes into account time of day, location etc. Widgets can only be built with SwiftUI.
It is important to note that widgets are not mini-applications. In addition to providing a Link (a universal link and only for medium and large size widgets) that allows you to set a URL to navigate to a particular part of your application, you can link the entire widget with a widgetURL link. You cannot add animations or other interactions to widgets (such as fields, buttons, etc.).
Environment
Only projects that use WidgetKit starting with Xcode 12 can be created.
We create the widget
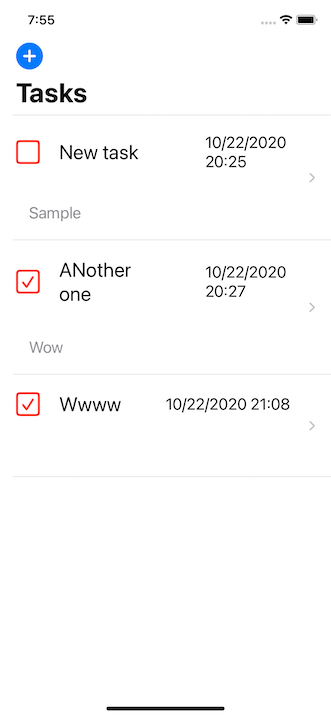
We have an application that helps us manage pending tasks. It is a very simple application that has the graphical interface like this:
 We added new Widget Extension target to the Xcode 12 project and ensured that the SwiftUI application lifecycle is chosen.
To create our first widget, go to File → New → Target and select the “Widget Extension” template.
We added new Widget Extension target to the Xcode 12 project and ensured that the SwiftUI application lifecycle is chosen.
To create our first widget, go to File → New → Target and select the “Widget Extension” template.
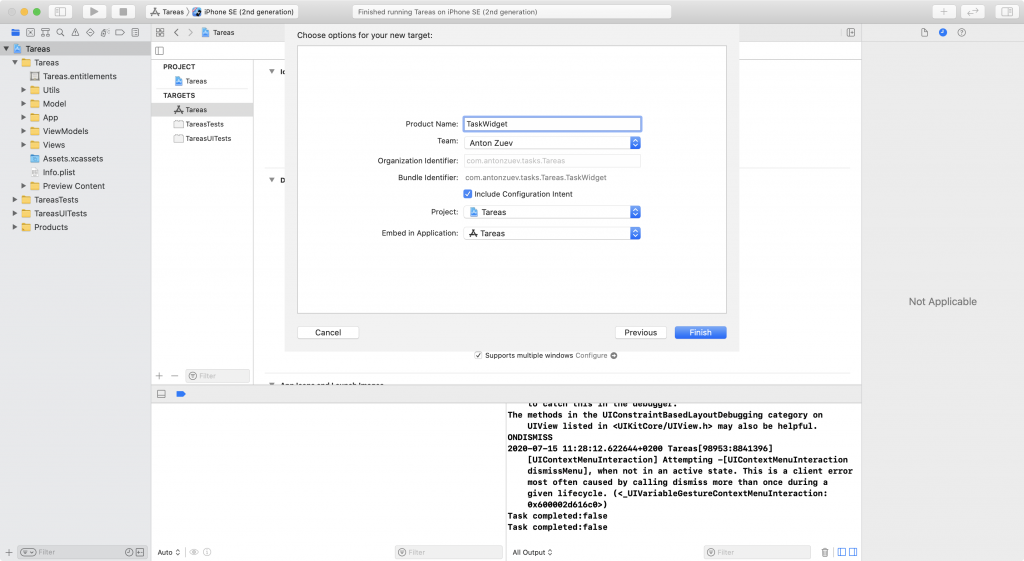
By adding the “Widget Extension” target you can see a lot of code that you don't understand. Let's go over it.
To create the widgets, the WidgetKit framework is used. The TaskWidget structure code is the starting point for our widget:
@main
struct TaskWidget: Widget {
    private let kind: String = "TaskWidget"

    public var body: some WidgetConfiguration {
        IntentConfiguration(kind: kind, intent: ConfigurationIntent.self, provider: Provider()) { entry in
            TaskWidgetEntryView(entry: entry)
        }
        .configurationDisplayName("Task Widget")
        .description("The widget that show pending tasks for today.")
        .supportedFamilies([.systemLarge, .systemMedium, .systemSmall])
    }
}
- kind is an identifier used to distinguish the widget from others in the WidgetCenter.
- the widget content is set inside the TaskWidgetEntryView which we will see shortly.
- the provider is a structure of type TimelineProvider that is the core engine of the widget. It is responsible for feeding the widget with data and setting intervals to refresh the data.
- the configurationDisplayName and description view modifiers display respective information in the widget gallery, a place that displays all the widgets on your device.
There is another new modifier supportedFamilies that contains the different widget sizes we want for our app. For example, .supportedFamilies ([. .systemLarge]) only allows large widgets.
Timeline Provider
As its name suggests, the provider structure seeks to provide data for the widget's content. It conforms to a TimelineProvider protocol that requires the implementation of three methods (getSnapshot, getTimeline and placeholder):
struct Provider: IntentTimelineProvider {

    public func getSnapshot(for configuration: ConfigurationIntent, in context: Context, completion: @escaping (SimpleEntry) -> Void) {
        let entry = SimpleEntry(date: Date(), tasks: [TaskModel(id: UUID(), title: "task", note: "SimpleNote", completed: false)])
        completion(entry)
    }

    public func getTimeline(for configuration: ConfigurationIntent, in context: Context, completion: @escaping (Timeline<SimpleEntry>) -> Void) {
        var entries: [SimpleEntry] = []
        let tasksUncompleted = CoreDataManager.sharedInstance.fetchAllTodayUnCompletedTasks().map(TaskModel.init)
        // Generate a timeline consisting of entries of tasks that should will be completed today.
        for i in 0 ..< tasksUncompleted.count {
            let entryDate = DateUtils.getDateFromString(for: tasksUncompleted[i].dueDate)?.addingTimeInterval(-6200)
            let entry = SimpleEntry(date: entryDate ?? Date(), tasks: tasksUncompleted)
            entries.append(entry)
        }
        if entries.isEmpty {
            entries.append(SimpleEntry(date: Date(), tasks: []))
        }
        let timeline = Timeline(entries: entries, policy:.atEnd)
        completion(timeline)
    }

    func placeholder(in context: Context) -> SimpleEntry {
        SimpleEntry(date: Date(), tasks: [TaskModel(id: UUID(), title: "Task", note: "Note", completed: false)])
    }
}
The getSnapshot function is used to immediately render a widget view, while the provider attempts to load the data. It is important that you set the getSnapshot method to only dummy data, as this view will also be displayed in the Widget Gallery. The getTimeline function, on the other hand, is used to create one or more entries. We can set the time interval after which TimelineEntry should be updated. The code above creates the entries containing today's tasks. They will be used to update the content of the widget.
The Timeline class instance also contains a TimelineReloadPolicy. The system uses this policy to determine when to invoke the getTimeline function again, to load the next set of entries. In the example above, the policy is set to atEnd, which means that after the SimpleEntry is displayed in the widget, the system will trigger the getTimeline function for the next entry. In addition to atEnd, we can also use afterDate. It is used to set a specific date when we want to get the next entry. Please note that the system may not activate the getTimeline function on the exact date. Additionally, we can set a never policy to ensure that the getTimeline method is not triggered again. Additionally, if you want to trigger a reload of widget entries, you can use the WidgetCenter API. It allows us to reload all timeline entries again.
struct SimpleEntry: TimelineEntry {
    public let date: Date
    public let tasks: [TaskModel]
    public let configuration: ConfigurationIntent
}
You have to define the structure of the timeline entry. It usually contains the data needed to display in the widget.
The placeholdermethod is used to define the widget's graphical interface while it is loading. You need to pass a simple input and the rest is done by SwiftUI itself.
WidgetView
Now that we are clear about how the provider works, let's look at the SwiftUI view that it will display as the widget on the screen.
struct TaskWidgetEntryView : View {
    var entry: Provider.Entry

    @Environment(\.widgetFamily) var family

    @ViewBuilder
    var body: some View {
        switch family {
        case .systemSmall:
            if entry.tasks.count > 0 {
                VStack(alignment: .leading) {
                    ForEach(entry.tasks, id: \.self) { task in
                        TaskView(task: task)
                   }
                }.padding(5)
            } else {
                Text("No tasks")
            }
        default:
            if entry.tasks.count > 0 {
                VStack(alignment: .leading) {
                    ForEach(entry.tasks, id: \.self) { task in
                        TaskView(task: task)
                   }
                }.padding(5)
            } else {
                Text("No tasks")
            }
        }

    }
}
WidgetKit fills the widget with the data set from the provider's input. The entry property is the data source for our widget view. TaskView is a view that contains the main part of our graphical interface. We use the image and the text. It is a super simple interface.
struct TaskView: View {
    let task: TaskModel

    var body: some View {
        HStack {
            Image(systemName: "square").foregroundColor(.red)
            Text(task.title )
            .font(.system(size: 15))
        }
        Text(task.dueDate)
            .font(.system(size: 10))
        Text(task.note)
            .font(.system(size: 10))
    }
}
If we add our widget to the Home screen we will see the following image:
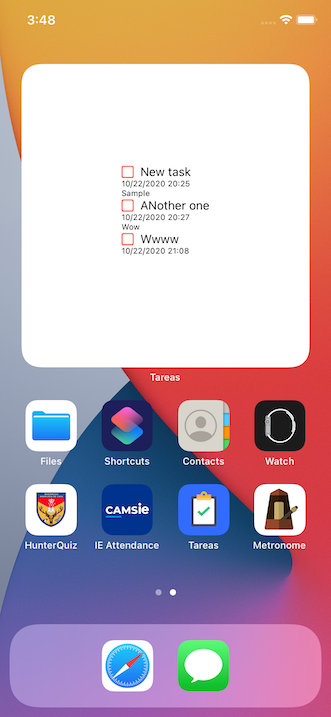 The widget only shows you the information, we cannot interact with the views of the widget. It is a way to inform the user about the current application status. If the user clicks on the widget, the application opens. There is only one way to add different links to the widget. With the help of universal links you can add the links to the widget using Link API. They are like web links that direct you to the different parts of the application.
Conclusions
You can easily create widgets using the WidgetKit API. It is a new way to show the user the application state or just an important part of the application. Cannot interact with the widget. It is just a facade or showcase of our application. Even so, it can facilitate the user's daily use of our application by showing the information that is important to him at this moment.
If you want to download the project with the example the repository with the project is here.