
Getting started with Xcode UI testing
2019-02-28

- Introduction
- Environment
- Creating a test
- Write UI test automatically
- UI testing frameworks
- Conclusions
- References
Introduction
UI tests are a great way to ensure that your most critical UI interactions continue to work as you add new features or refactor your app's codebase.
It's also a good way to automate repetitive tasks when working with UI code (when you have to navigate deep into your app to test something you're working on, for example).
Writing and running UI tests is slightly different from unit testing, since you're actually interacting with your application, rather than programmatically testing against a certain API. Both have a lot of value and the best approach is to use both for different tasks.
Xcode ships with UI tests built into the XCTest framework, which you've probably already used for unit testing. These UI testing features have been around for a few years, but many developers have found them unstable and difficult to use. And that used to be true, since in the first iterations things were actually very unstable, but these days I think it's worth giving them a second chance if you haven't already.
Environment
This tutorial is written using the following environment:
- Hardware: MacBook Pro 15' (2.5 GHz Intel Core i7, 16GB DDR3, mid-2015)
- Operating system: macOS Mojave 10.14.2
- Software versions:
- Xcode: 7+
- iOS SDK: 9.0+
Creating a test
If your app doesn't already have a UI test target, all you have to do to add one is go to File > New > Target... in Xcode and select "iOS UI Testing Bundle." Next, edit your app's scheme: go to “Product” > “Scheme” > “New scheme…” in Xcode and add the UI test package under “Test”. An example where a UI test can be a great solution is when we want to test a fairly complicated user interface. Let's say the user has to go through different screens and at the end of the last screen, an "Open another flow" button appears, which you have to press to open another flow:
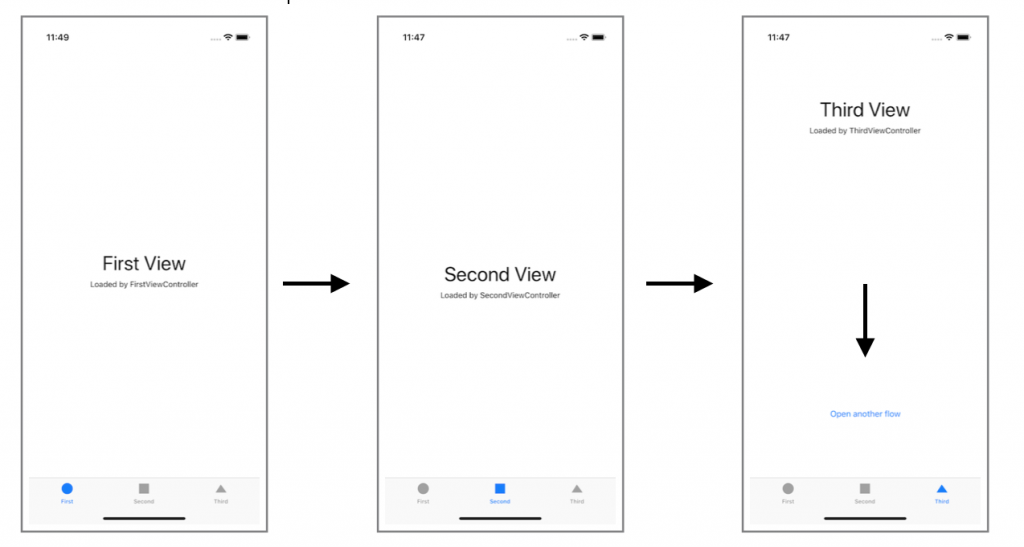
So, let's write a very simple test to check this scenario:
func testExample() {
        // Launch the application
        app.launch()
        // Verify that the first page is displayed
        XCTAssert(app.otherElements["firstView"].exists)
        // Get all application pages
        let tabBarsQuery = app.tabBars
        // Tap the second tab bar button to change pages
        tabBarsQuery.buttons["Second"].tap()
        // Tap the third tab bar button to change pages
        tabBarsQuery.buttons["Third"].tap()
        // Swipe to the bottom of the second page
        app.scrollViews.containing(.staticText, identifier: "Third View").element.swipeUp()
       // Tap the button to open another flow
       app.buttons["Open another flow"].tap()
       // Verify that the first page view is not displayed
       XCTAssertFalse(app.otherElements["firstView"].exists)
    }
As you can see above, we performed our test by interacting with our UI, performing taps, rather than calling our own API. In fact, our tests will run in a completely different process, so we don't have access to our own code. This "forces" us to actually test the use of our application, instead of "faking" it.
Write UI test automatically
To start writing UI tests you don't need to know a special Xcode API. We can create new tests without writing any words thanks to an Xcode functionality. Just launch our app and press a button! Incredible! Once your application is ready to record a test, open a file in the UI test target and insert the cursor into a UI test method.
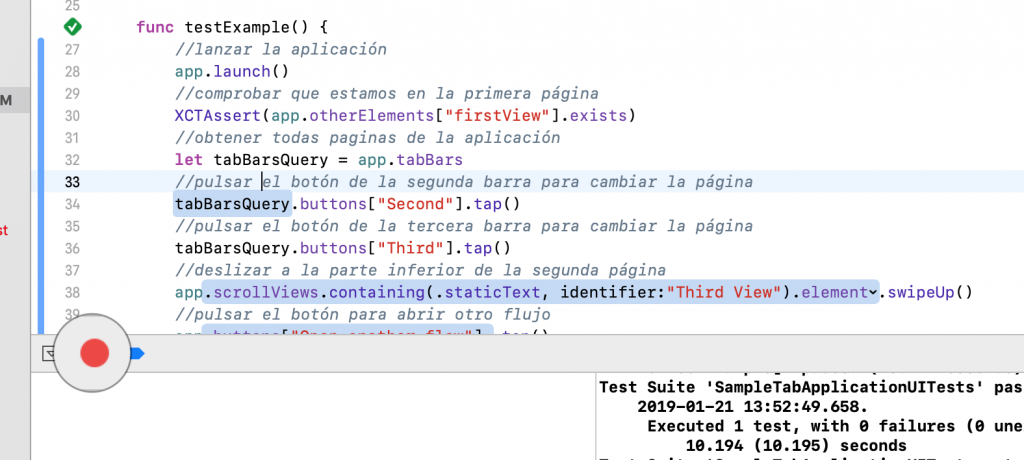
It can be added to an existing test method or created a new one. Click the Record button and Xcode starts its application in Simulator. Every time you tap an element on the screen, Xcode adds a line of code to your test method. Click the Record button again to stop adding actions to the method.
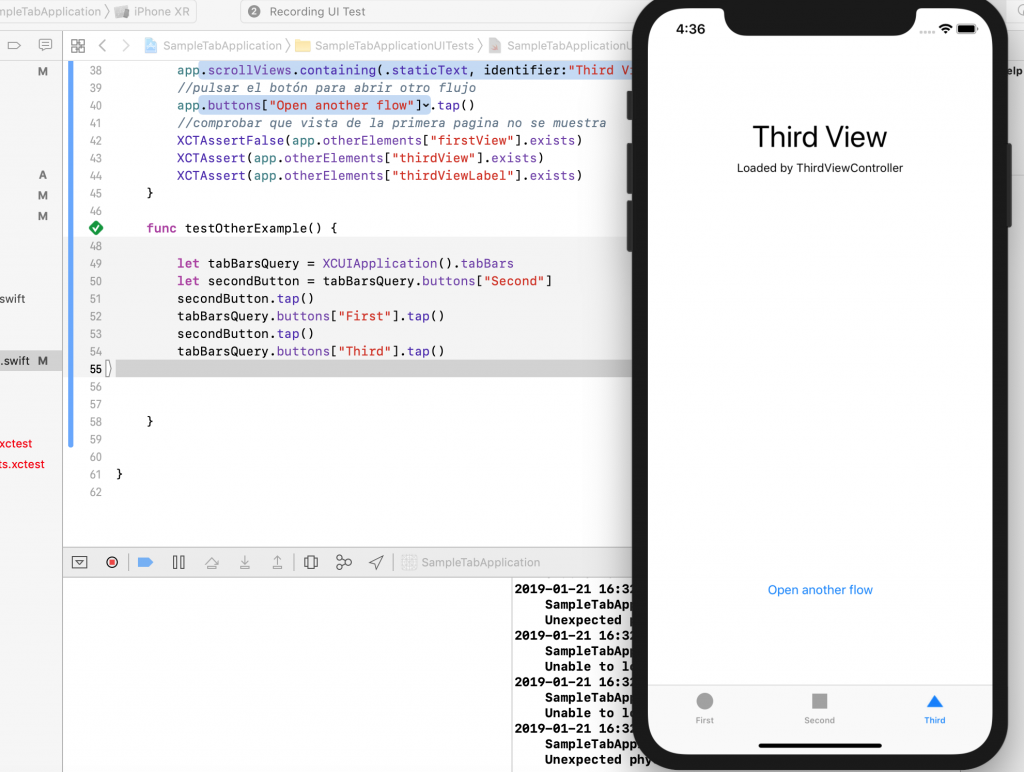
After the test is complete, add assertions to check if the UI is in the correct state. Assertions can be used to test parts of the interface, text buttons, the number of table view cells, the existence of a particular button, and much more.
// Verify that the first page view is not displayed
XCTAssertFalse(app.otherElements["firstView"].exists)
// Verify that the third page is displayed
XCTAssert(app.otherElements["thirdView"].exists)
XCTAssert(app.otherElements["thirdViewLabel"].exists)
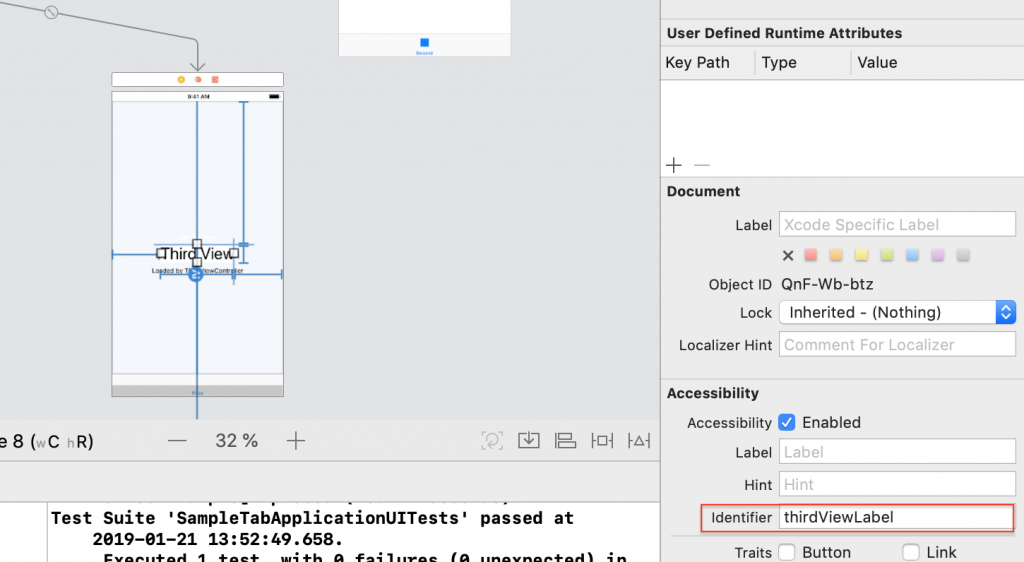
To use API "otherElements" it is essential to enter the accessibility identifier
UI testing frameworks
# XCUITest
A few years ago, Apple discontinued its JavaScript automation framework and replaced it with XCUITest. This is a native Apple-compatible library, which means you can write your UI tests in Objective-C or Swift. One thing I have to point out is that it does not check elements (labels, buttons, etc.) that contain a value. Instead, it checks the value that exists on the screen. **
XCUITest runs in its own process. This has some advantages but also disadvantages. You can see everything on the screen, but you can't check what the internal state of the application is. This is quite good as it prevents developers from making mistakes related to knowledge that a normal user does not have. On the other hand, being in a separate process also means that it needs some time to sync the application state. This takes time and slows down the test. Additionally, when performing some time-consuming operations, it may cause errors due to XCUITest not finding the requested item.
Since its introduction, constant improvements are being made with each release of Xcode. The most recent version adds options such as: launching multiple apps at the same time (to watch how they interact), hot boot (sending the app to the background and recovering it), taking screenshots and etc. So, even if you decide that XCUITest is not the right framework for you, you may want to keep track of it.
# EarlGrey
In early 2016 Google launched EarlGrey. The difference between XCUITest and this UI automation framework is that EarlGrey and the application share the same process. The test called GreyBox can influence shared memory, thus changing the runtime behavior of the application. In its Github repository, Google provides detailed instructions for setting it up. As for timing. Google claims that because EarlGrey shares the same process, it takes care of the synchronization itself. Although you may have access to it, you probably don't need it.
# Appium
Appium is different compared to XCUITest and EarlGrey. It is cross-platform and it is not necessary to use a native language. So the idea is that you write tests yourself in your preferred language and use them on all supported platforms. This can cut test writing and maintenance time in half, since in an ideal world, tests work on Android and iOS in the same way. If you've ever worked on an app that supports both platforms, you already know the result. It's not realistic. Instead, Appium writes the same tests for both platforms.
What puts me off the most when using Appium is the speed. A simple login test:
- Start application
- Enter credentials
- Press Enter
- Check if you are connected This can take Appium 2(!!!) minutes to complete. The same thing is done in XCUITest or EarlGrey in less than 10 seconds (which is quite a long time).
# Cucumberish and other options
There are more options than the previous ones. In case you want to write only in Swift or Objective-C, there are KIF and Frank. Otherwise, if you like BDD and for example the Cucumber framework, there are frameworks that use Cucumber, for example Cucumberish or Calabash. Between the two, my preferred choice is Cucumberish, as it is a semi-official framework for iOS. It is fully integrated with Xcode Test Navigator and XCUITest, the tests are written in Swift/Objective-C and there is no need to use Ruby or other tools to write the test steps. Additionally, test reports will appear in Reports Navigator like any Xcode test, but it is not well documented and requires prior knowledge of Cucumber.
The main thing about Cucumberish are its ".feature" files that contain the descriptions of the functions of our application that we want to verify with our tests. They are written in Gherkin, which is the language that allows functionality to be described in a natural and simple way.
Feature: As someone who plans to automate the iOS project test cases, I will use Cucumberish.

# The first line in the scenario is its name,
# This also appears in the Xcode Test Navigator
Scenario: First scenario

# This is the first step in the scenario
# The context for our test
Given user launch the application
# The condition for our test
When user touch the buttons
# The result we want to achieve
Then user sees other flow

# Note that each step must begin
# with "Given", "When", "Then", "And", or "But".
When I run the application
Then I can see the first page
The developer then has to correlate the scenario steps with the already written XCUITest tests. Thus, non-technical people and developers can collaborate on the same project with minimal effort.
import XCTest

// The connection between developer tests
// and the descriptions in the .feature file
@objc class SampleUITestSteps: SampleUITests {

    func SampleUITestsImplementation(){
        Given("user launch the application") { (args, userInfo) in
            SampleUITests().runApplication()
        }

        Then("verify that we are at the start") { (_, _) in
            SampleUITestSteps().verifyThatWeAreAtTheStart()
        }

        When("user touch the buttons") { (args, userInfo) in
            SampleUITests().openOtherFlow()
        }

        Then("user sees other flow") { (args, userInfo) -> Void in
            SampleUITests().verifyOtherFlowIsOpen();
        }

        When("I run the application") { (args, userInfo) in
            SampleUITests().runApplication()
        }

        Then("I can see the first page") { (args, userInfo) in
            SampleUITests().verifyThatWeAreAtTheStart()
        }
    }
}
In this way, the developer can adapt his already written tests with the client requirements or the acceptance criteria of the user story.
import XCTest

// XCUITest tests already written by the developer
class SampleUITests: XCTestCase {
    let application = XCUIApplication()

    func runApplication(){
        // Launch the application
        application.launch()
    }

    func openOtherFlow() {
        // Get all application pages
        let tabBarsQuery = application.tabBars
        // Tap the second tab bar button to change pages
        tabBarsQuery.buttons["Second"].tap()
        // Tap the third tab bar button to change pages
        tabBarsQuery.buttons["Third"].tap()
        // Swipe to the bottom of the second page
        application.scrollViews.containing(.staticText, identifier:"thirdViewLabel").element.swipeUp()
        // Tap the button to open another flow
        application.buttons["Open another flow"].tap()
    }

    func verifyThatWeAreAtTheStart() {
        // Verify that the first page is displayed
        XCTAssert(application.otherElements["firstView"].exists)
    }

    func verifyOtherFlowIsOpen() {
        // Verify that the tab views are not displayed
        XCTAssertFalse(application.otherElements["firstView"].exists)
        XCTAssertFalse(application.otherElements["secondView"].exists)
        XCTAssertFalse(application.otherElements["thirdView"].exists)
    }

    func tapBarButtons() {
        let tabBarsQuery = XCUIApplication().tabBars
        let secondButton = tabBarsQuery.buttons["Second"]
        secondButton.tap()
        tabBarsQuery.buttons["First"].tap()
        secondButton.tap()
        tabBarsQuery.buttons["Third"].tap()
    }
}
Conclusions
In order to make your UI tests easy to maintain and quick to run, it is advisable to make them as simple as possible and leave complex logic verification to unit tests. This type of testing offers the best “bang for the buck” as UI tests are slower as they have to run your app and wait for animations etc. Additionally, UI testing makes debugging much less painful and avoids problems that are not so obvious from a code point of view. Like when you have invisible or inaccessible elements in your interface.
In general, the most important thing about testing and this also applies to UI testing, is that it gives me much more confidence when changing my application or before sending it to the client.
As you can see from the examples, UI tests also use UIKit's accessibility features to find interface elements, which means that if you spend some time implementing some UI tests, you can improve the accessibility of your app. Bingo!